Do you ever want to take a screenshot of your screen to include in a post or send to someone in an email?
There is a way to do this in windows, you press Ctrl and PrntScr at the same time and you get a copy of your entire screen. But, sometimes I want to share a portion of my screen and don’t need to include other windows I have open or other tabs I have open in my internet browser. So, then I’d have to paste the screenshot into a picture editing program, crop out the pieces I don’t want and save it somewhere as a file.
BUT, there’s a simpler way! Microsoft built a tool for taking a screenshot of a PORTION of your screen and included it in Windows (but hid it so nobody knows about it). Well, now you will know about it and it will become one of your favorite tools. Remember, I’m all about making life easier and more efficient! 🙂
This nifty little tool is called the ‘Snipping Tool’ and comes with Windows!
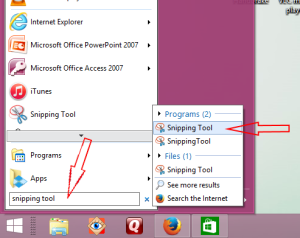
I pinned this tool to my taskbar so I don’t have to look for it when I need it. To do this click on the start button on your desktop (if you’re using Windows 8 make sure to read my post on how to add a start menu back to Windows 8) and in the search box type “snipping tool”. In the search results under programs you will see Windows’ Snipping Tool!
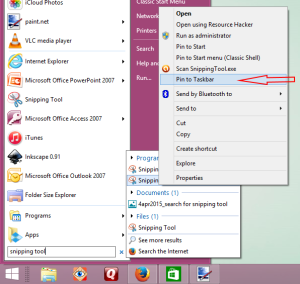
 Next, right click where it says Snipping Tool under programs and then select “Pin to Taskbar”.
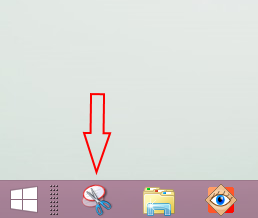
  Now it will stay on your taskbar and any time you need it you can just click the icon.
 Take a Screenshot with the Snipping Tool
To open the snipping tool you just click on your new icon on your taskbar. You’ll get a small window on your screen with three buttons: New, Cancel and Options. To take a screenshot you click new and draw a rectangle around the area you want to capture by clicking with the mouse and holding down while dragging to form a rectangle. When everything you want is in the screen you let go of your mouse and the image is captured. The image will show up in a new window where you’ll have the option to copy it (for pasting into another program), save it as a picture file or email it as a picture file.
It’s as simple as that! No more taking an entire print screen and messing around with cropping out portions you don’t want displayed. I’ve also used this to take a picture of a portion of a report instead of creating a pdf of it to email it off to someone. It definitely saves a few steps just taking a quick screenshot and pasting it into an email.
Snipping Tool’s Features
I tend to use the basics of this little program but there are several added features I should mention. When taking your screenshot instead of using the rectangle tool there is a dropdown menu on the New button which also offers you to take a screenshot of a freehand selection, of just one window or of your entire screen. Then, once your screenshot opens in the second window there are options for marking it up with a pen or highlighter before saving or sending.
I hope you find this little tool useful. The uses are really limitless. I’d love to hear how it saves you time, leave a comment below!
References: Microsoft’s Website
Hi there! Stopping by from My Favorite Things Saturday link party. This is a great tip! Macs have a similar tool with Command+Shift+4!
Ashley recently posted…Very Inspiring Blogger Award
Thanks for posting for the mac users. Unfortunately, unless it’s an iphone or ipad when it comes to apple I’m pretty illiterate. 🙂
Thanks for stopping by!
Great !! Thanks for the tip , Amy !! Have a nice Weekend !!
You’re welcome Mark – thanks for stopping by!
Enjoy your weekend! 🙂
I use the snip tool all the time. Very useful and I also pinned it to the task bar.
I find myself using it quite a bit! It’s handy to send a graph or snippit of an excel file to someone in an email. Thanks for stopping by! 🙂
Snipping tool is pretty great. I used it for a while before I ran across this: http://www.paintshoppro.com/en/pages/screenshot/ Now I mostly use the open source tool I found there so I can quickly retouch or edit before sending the shot 🙂
The page you linked to here is a great resource as well…thanks for sharing! Which option are you using? I would like a better way of retouching. I’m currently pasting it into paint.net if I need to retouch or add any comments/drawings to it. I’m thinking there has to be a faster way though…
Amy
Third party softwares are way easier to use with their advanced features
Bob recently posted…How To Screenshot On Windows Laptop With And Without Snipping Tool
I’ve heard there are some good third party tools. Which one do you use?
Amy