NotDigital cameras and smartphones have made it so easy to snap pictures…thousands of pictures! So, where do you store all those pictures? And how do you find a specific one when you’re looking for it? Well, as with many things, “there’s more than one way to skin a cat” as they say. There are many different ways to organize and store your digital pictures, it’s just a matter of finding a way that works for you. Over the years I’ve found that this system is easy and not time-consuming. Efficiency is key so this way of organizing digital pictures works for me.
 Note: This post may contain affiliate links.
FastStone Image Viewer
FastStone Image Viewer is a free program I use for organizing and managing my photos. (You may also be interested in the other free programs in our post 15 powerful free computer programs post.) To download the program, visit the FastStone Image Viewer page.
After downloading and installing FastStone you’ll open it to find a window with several panes. It can be configured in many ways but for our purposes I have it set up like shown below. The top left, browser view, shows the file folders on my computer. The right side of the screen shows the pictures within the folder that is selected in the file tree of the upper left. Finally, the lower left pane shows a larger view of a picture selected in the right hand side.
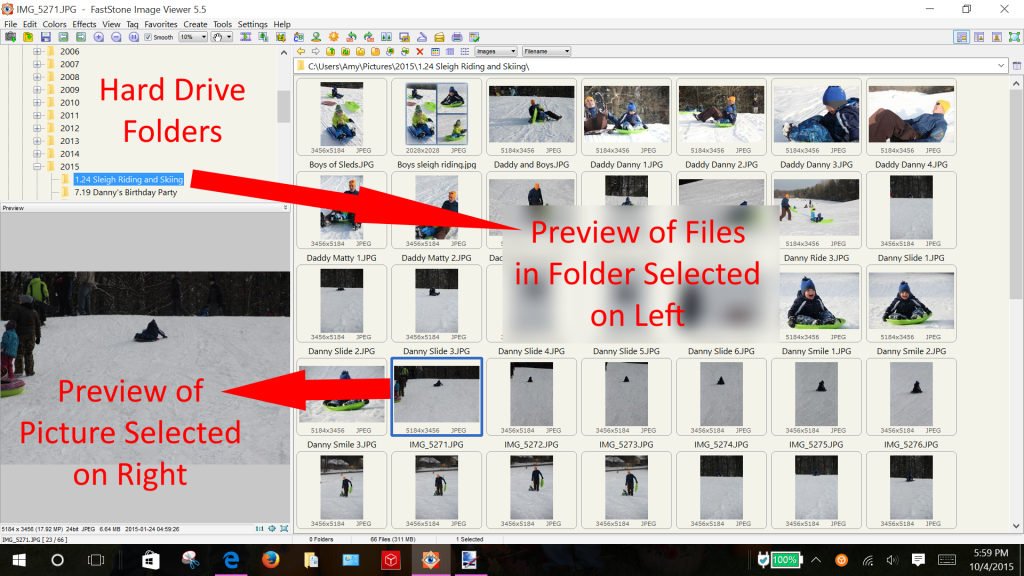
To adjust the configuration of the screen use the view menu. To achieve the configuration shown in the image above make the following selections:
- View menu > Layout > Browser View (Left)
- View menu > Browser Style > Thumbnail View
Note: In this post we’ll review the basics for using FastStone Image Viewer to organize and manage your digital pictures. But this program has vast capability we won’t cover in this post.
How to Organize Digital Photos
There are many ways to organize your digital photos, the method I’ve found that works for me is to file them by year and event. In my digital picture folder I create a separate folder for each year. Then, within each year folder I create subfolders for special events. The event folder names start with the event date so they can be sorted by date. Misc pictures for each year are either left in the year folder or placed into appropriate folders, the busiest being one called ‘Family’. So, as an example, subfolders for a given year might have the following names:
- 1.21 Sleigh Riding
- 3.15 Skiing at xyz Mountain
- 7.4-7 Camping
- 10.31 Halloween
- 12.23-31 Holidays
- Family
- Kids Sports
Usually there are many more folders but you get the idea.
In addition to the year folders there is a folder called ‘NEW – TO SORT’. All pictures imported from my camera or iPhone are placed into this folder. Then, as I have time, I can move them into individual folders. When all sorting is done, the ‘NEW – TO SORT’ folder is empty.
Step by Step Method for Sorting Digital Pictures
Let’s assume all of your pictures are currently in one big folder. Here’s a step by step method for organizing them:
- Rename the large folder to: ‘NEW – TO SORT’
- In the browser view (upper left) find the folder that your digital pictures are stored in
- Click once on the name of the folder to highlight it, then right click on it and select Rename
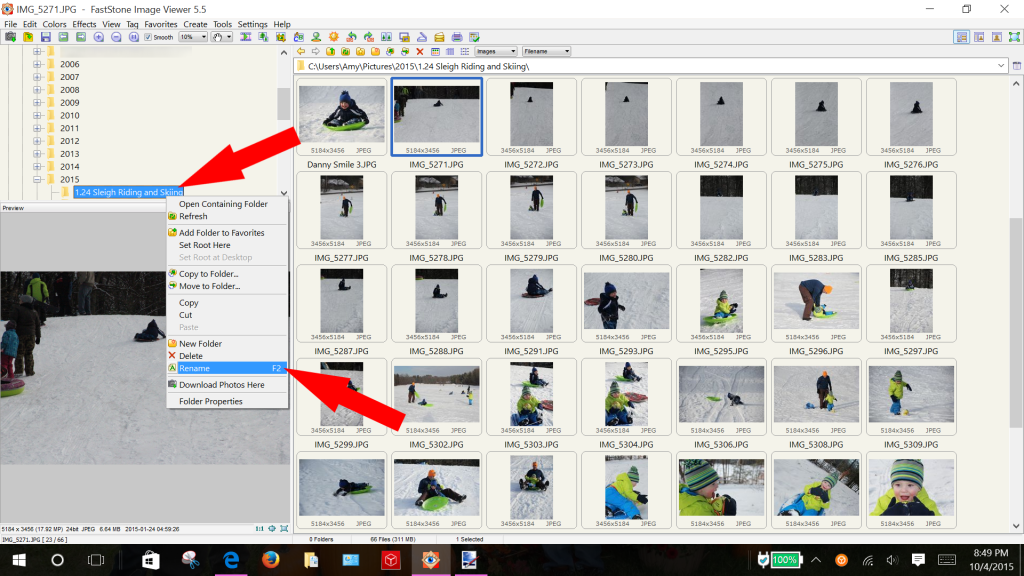
- Type in NEW – TO SORT and click enter
- Create year folders for each year you have pictures
- Still in the browser view, find the folder called Pictures (this folder is usually created by Windows when you create your login); Click once on the Pictures folder so it is highlighted
- In the top menu bar you’ll see a icon with a picture of a folder and a red star over it; Click on this icon to create a new folder; A new folder will be created and it will prompt you to enter a name for it; Type 2015, or whichever year you’d like to create
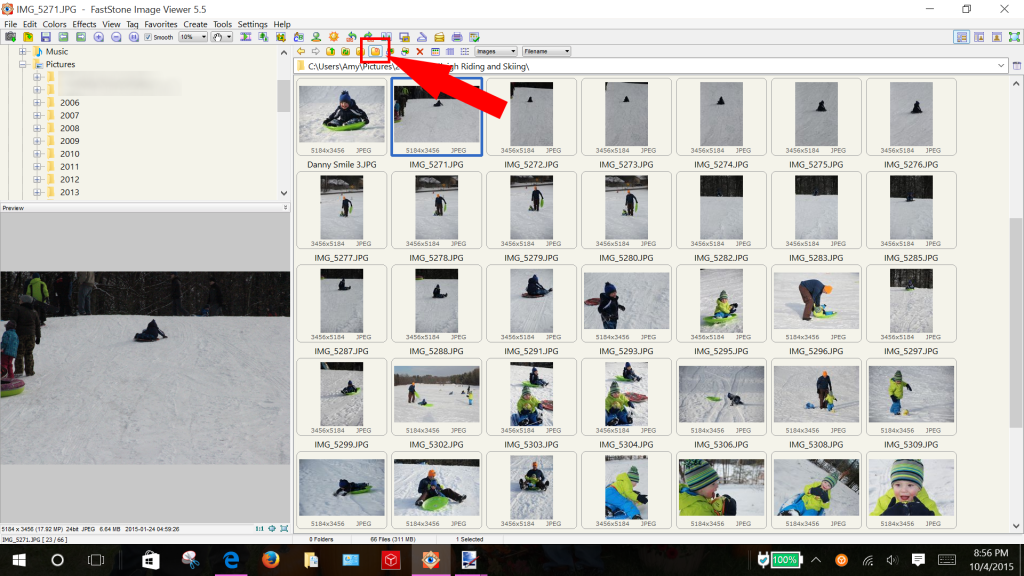
- Repeat the previous steps for each year folder you’d like to create; Make sure that you select the Pictures folder before creating each new folder so they will all be placed directly within the Pictures folder
- Move pictures to its appropriate year folder
- Click on the folder that contains all of your pictures in the browser panel (upper left); On the right side of the screen you should see all the pictures
- Change the view in the right panel so the picture dates are showing by selecting the icon shown below
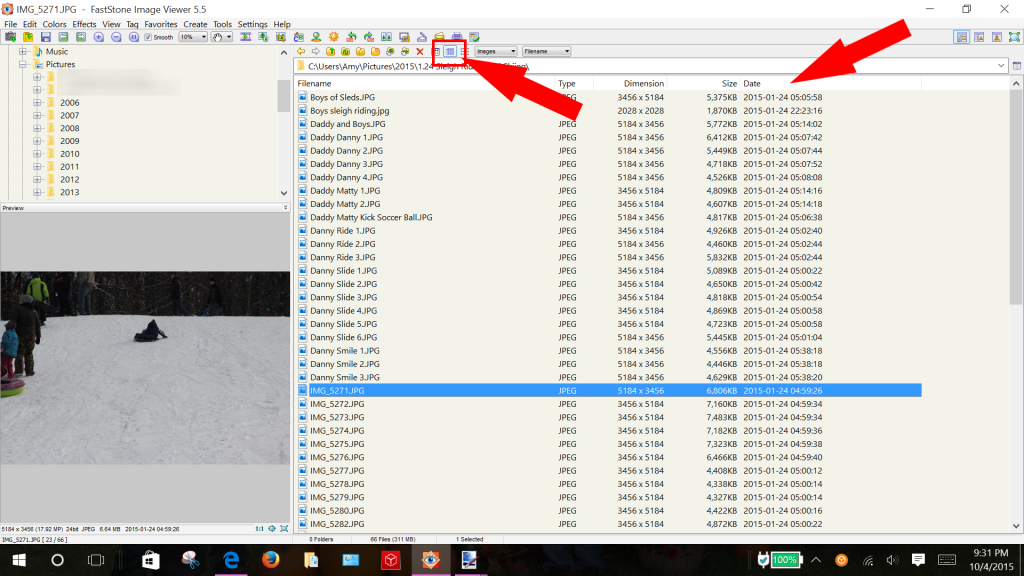
- Sort the pictures by date order by selecting the word ‘Date’ at the top of the date column
- Select all the pictures from the first year shown; So, say the oldest picture you have is from 2013, select the first picture by clicking once on it; Then, scroll down until you find the last picture with a 2013 date; Hold the shift key down and click once on the last picture with a 2013 date; Now all the pictures in between will be selected
- Now that all 2013 pictures are selected, hover your mouse over them, right click and select Move To Folder
- In the window that opens, select Browse and find the 2013 folder, click OK, then click Move; Now all 2013 pictures are in your 2013 folder!
- Continue the steps above until all pictures are in their appropriate folder
- Create sub-folders for events that have a large numbers of pictures
- Select one the year folders in the upper left browser window
- Change the view in the right panel so you can see details of each picture, including the date
- Sort the pictures by date by clicking on the top of the date column
- Select the group of pictures you’d like to move to a sub-folder by clicking on the top picture once and holding the shift key down while clicking on the bottom picture – all pictures in between will be selected
- Hover your mouse over the selected pictures, right click and select Move to Folder
- When the move to folder window opens, select browse
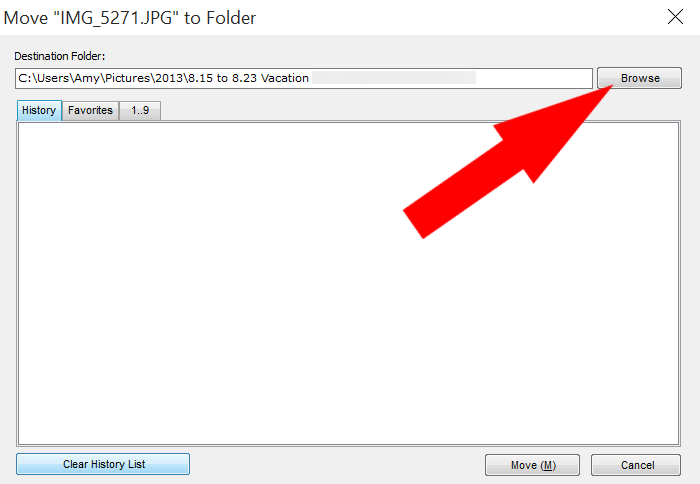
- Next, click on the folder for the year in which you’d like to create your sub-folder and click Create Folder
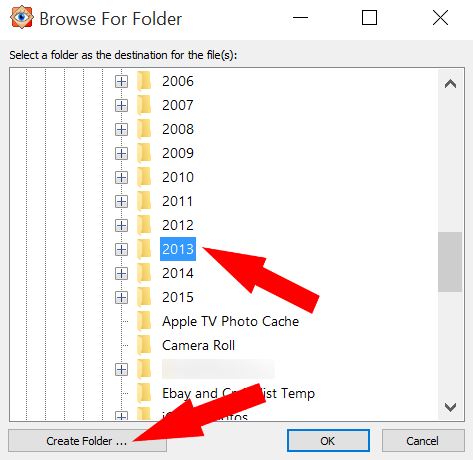
- A new folder will be created and the name will be highlighted; Change the name of the new folder; By using the following format you’ll be able to sort the sub-folders in date order (if you’re obsessive like me this is key 🙂 ) “month.year description of event”
- After you’ve named your new folder click Ok, then click Move in the Move to folder window and the pictures you selected will be organized in your new event folder
- Continue the steps above by creating and organizing as many pictures into event folders as you like
- You can keep the leftover pictures in your year folder or separate them into appropriate folders like: Family, Sports Events, etc
There you have it! A step by step guide to organizing your digital pictures. Now, there are countless other ways for organizing and storing your digital photos. Some people prefer to use tagging (FastStone includes a tagging option) but I’ve found this too time consuming. You can tag by event like “Holidays” or tag people. Some software available, like Google Picasa, includes facial recognition to help you tag individuals. Now don’t forget…once you’ve got all your pictures organized…don’t forget to backup, backup, backup! If you need help check out our post on three different techniques for backing up your computer and memories!
If you have any problems, leave a comment – we’re here to help.
This looks useful. Given my backlog of pix, I could be at this a while. (Don’t even ask me about my filing backlog, sigh). But this looks easier than anything else I’ve seen. I also need a good way to round out duplicates. I really like that you can sort by the date the pic was taken. Now, if I can just get it to connect to Google Pictures.
Anne Louise Bannon recently posted…From the Dark Side of the Fridge: Salad Basics II
It’s overwhelming, isn’t it? I’m behind now and have to get caught up to print some out for scrapbooking. 🙂 Even getting them grouped by year would make you feel so much better. And it should be pretty quick with this method. I’ll have to do some research for you on identifying duplicates. I’ve heard other people who have that problem as well, I’ll see if I can come up with a solution for you. I haven’t used Google Pictures as I think I’d go way over on storage. What do you use it for? Thanks for stopping by!
Anne, I did some research and found a neat little (free) program that finds your duplicate photos for you! I didn’t think I had a duplicate photo problem but I installed the program to test it and found 5,105 duplicate photos on my computer?!!! I’m working through them now but this should clear up a HUGE amount of hard drive space! 🙂 Anyway, thought it might help you out…here’s the link to the website: http://www.duplicate-finder.com/photo-download.html . Be careful to always select custom install and de-select two additional programs they try to sneak through. I’ll be putting together a post on how to install and run this in case you want to wait for more details. Hope this helps! -Amy
I really like this idea. Also, I’ve started using less of my photos where the main subject is far off in the distance. Unless it’s a very large group shot with 3+ people sledding down a hill. I try to get more of the closer shots where the person in the photo takes up at least 20% of the image. This has narrowed down how many photos I print and put in the scrapbook, and you can actually see the expressions on their face. I’m so happy with how my 2015 book turned out!
That sounds like a great plan Jenn, glad your 2015 books came out well. (I haven’t even started scrapbooking 2015! 🙂 ) I find it so difficult to get rid of pictures – even if they’re bad. But, I do try to only print the best ones for scrapbooking. Hopefully this post helped you organize your pics more-it can be so overwhelming!