Sharing information with others continues to get faster and easier with advances in technology and software. A recent addition to Apple’s software allows for easier sharing of photos, videos, websites, locations and more with your friends, family or strangers if you like. In this post we’ll give an introduction and tutorial on how to use this feature, called airdrop.

Where is Airdrop Available?
Airdrop is an apple service so it is only available on apple devices. In addition, it wasn’t released until about 2011 so some older devices (or devices running older operating systems) do not have the airdrop capability.
To use airdrop you must have:
- iPhone 5 or later
- iPad (4th generation or later)
- iPad mini
- iPod touch (5th generation)
Your device also needs to be running iOS 7 or later. If you don’t know which iOS version is on your phone, go to Settings > General > About. In the about menu, scroll down to Version to see which version of iOS you have on your device. If the first number is 7 or higher you have airdrop capability.
Finally, you need to have WiFi, bluetooth and airdrop all turned on to be able to use the feature.

How to Turn on Airdrop
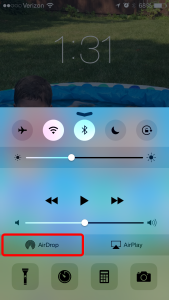
Before you share or receive anything from others with airdrop you have to turn it on. To do this, open your control center by swiping up from the bottom of your device (near the home button). When you swipe up, you will see your control center. This is a quick way to access some common features on your phone (or iPad) without having to go through the settings menu.
Toward the bottom left of the control center you should see the circular airdrop icon.

Clicking on this area of the control panel will give you three options:
- Off – airdrop is off and you will not be able to send or receive any items using this feature
- Contacts Only – you can share and receive items ONLY from people in your contact list
- Everyone – you can share and receive items from ANYONE close by who also has airdrop capability
Select contacts only or everyone to turn on airdrop.
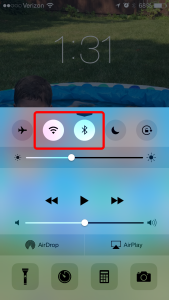
While you’re in the control center, make sure you have WiFi and bluetooth enabled as these need to be on to use the airdrop function.

How to Airdrop
Now that airdrop is enabled you are free to share your content with other people that have the airdrop capability and are close by (within about 30 feet). To use airdrop you first go to the item you’d like to share. Then, you select the share icon to access airdrop. We’ll walk you through a few examples below.
Airdrop Pictures and Videos
To airdrop a picture or video first open your Photos app on your iPhone or iPad. Once you find a photo you want to share click on the share icon.
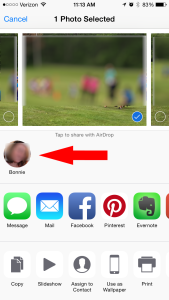
If you want to share more than one photo, scroll through your library and click on each photo you want to share. You’ll notice a blue checkmark appear on each photo that you’ve selected. When you’re done choosing your photos, look toward the bottom of the screen to the share menu. At the very top of the share menu is the airdrop section. In this section you will see a circle representing each individual / device that is close enough to you to airdrop to.
NOTE: If you don’t see any circles with names below them but only see the airdrop logo then there is nobody close enough to you that can accept airdrop OR they don’t have airdrop turned on.

Press the circle of the individual or device you’d like to share the picture with and it will show a “waiting” status. The individual you are trying to share the picture with will get a pop up notification asking if they’d like to receive an airdrop from you. They can accept or decline. If they accept, the photo(s) or video will be added to their photo app.
Airdrop Websites
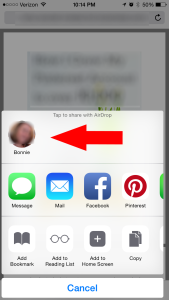
To share a website with airdrop you follow the same method as above but you start in the safari app. Here’s the step by step:
- Open safari
- Navigate to the website you want to share
- On the bottom of the screen click on the share icon
- Locate the circle representing the individual you want to send the link to and click on it
- Once the user approves, this website will open in their safari app

Airdrop Location
Sharing a location (using airdrop) works in the same manner.
- Open maps
- Navigate to a location you want to share
- On the top right of the screen click on the share icon
- Locate the circle representing the individual you want to send the link to and click on it
- Once the user approves, this location will open in their map app
Airdrop was a nice addition to iOS. Previously, to share a picture, you would have to send it to them with an email or text and they’d have to open the email/text, save the picture and then open their picture app. Airdrop has cut out a few of these steps and made sharing that much easier! What else have you found that you can airdrop? Leave a comment below – we’d love to hear from you!
References:
Apple’s Website
Wikipedia
A friend showed me how to use Airdrop last Spring to share photos, and I absolutely love it. Another great post of really helpful info Amy! Hope your summer is going well!
Susan – ofeverymoment recently posted…Saturday Spotlight: Adolescent Visitors
It’s sooo handy for sharing pictures when you’re in a group. The summer is flying by….hope you’re enjoying yours and thanks for stopping over Susan!